Learn How to Install and Wire A 3 Way Switch – A Complete Guide
Warning: This 3 way switch wiring post is informational only. There are risks with undergoing electrical work and we recommend you consult a professional electrician for any electrical work.
Understanding how to wire and install 3 way light switches is an important skill for any homeowner. Proper 3 way switch wiring allows you to control a light fixture from two separate locations – extremely convenient for rooms with two entryways like hallways and staircases. This comprehensive guide will teach you everything you need to confidently understand 3 way switch wiring!
Three-way switches, sometimes called 3 way light switches, allow you to toggle a light fixture on or off from 2 different locations – for example, at the top and bottom of a staircase. You’ll need to run 3-conductor cables between the switches and the light to allow for proper 3 way communication. Don’t be intimidated! With the right materials, wiring diagram, and safety precautions, you can learn how to make 3 way switch connections like a pro.
Why Would I Need to Install or Replace a 3-Way Switch?
There are a few reasons you may need to install or replace a 3 way light switch:
Have A Project In Mind?
Let's Text About Your ProjectConverting an existing single-pole switch to a 3 way switch to allow control from two locations. This allows you to access the light from both ends of a hallway or staircase.
Adding a new 3 way switching configuration to control overhead lighting from both ends of a hallway or staircase. This gives you convenient control without walking the full length of the hall.
Replacing an old or worn-out 3 way switch that no longer works properly. If you have to jiggle the switch for it to turn on, it likely needs replacing.
Upgrading from a standard toggle switch to a smart 3 way light switch that offers app control. Smart switches give you control via smartphone and voice control.
What Type of Cable Do I Use for 3 Way Switch Wiring?
- Use 14/3 cable with ground wire for all 3 way switch wiring connections.
- 14/3 cable contains 3 insulated conductors – 1 black, 1 white, 1 red. Plus an uninsulated ground wire.
- The red and black wires are known as the traveler wires in a 3 way switch wiring configuration. Travelers carry the signal between switches.
Do I Need to Upgrade the Electrical Boxes for 3 Way Switches?
When adding a new 3 way switch wiring configuration, you’ll likely need to replace the existing single-pole switch boxes with new ones.
Questions About Our Services?
Let's Connect And Discuss- The new electrical boxes need to be large enough to accommodate the additional wires. A single-pole box won’t have enough room.
- Look for electrical boxes labeled “3 way switch”. These have more interior space.
- Make sure the boxes are at least 1 1/2″ deep. This leaves room for wires to move freely.
Replacing the switch boxes takes a bit more time and effort, but it’s worth it for a safe and lasting installation. Trying to stuff a 3 way wiring configuration into a single-pole box is hazardous. (Resource: Family Handyman)

What’s the Correct 3 way Switch Wiring Diagram?
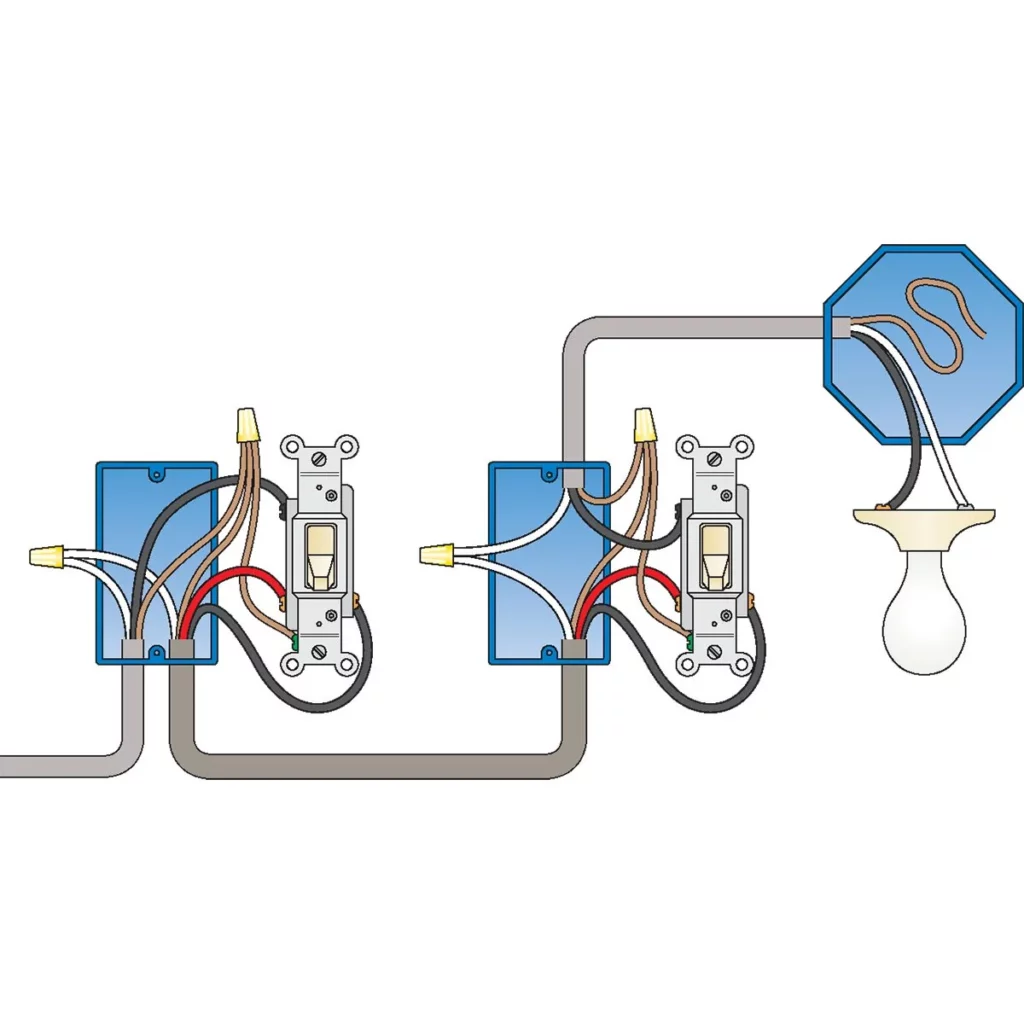
Here is a basic 3 way switch wiring diagram to follow:
[Insert simple 3 way switch wiring diagram visual]
Let’s break down what each wire is doing:
Power from the electrical panel goes to the common terminal on one 3 way switch, then to the light fixture. This is the hot feed.
Two traveler wires run between the two 3 way switches. These allow the switches to communicate on/off signals.
The ground wire connects to all boxes and switches for safety. Grounding prevents electrocution.
Now we’ll explain how to connect the wires correctly.
How to Wire a 3 way Light Switch
Follow these steps to wire two 3 way switches to control a light fixture from two locations.
1. Turn Power OFF and Remove Old Switches
Safety first! Turn off power at the circuit breaker and use a non-contact voltage tester to confirm power is off before wiring the new 3 way switches. Remove the existing single-pole switches if present. Make sure wires are disconnected.
2. Connect Switches and Light Fixture Boxes with 3-Wire Cable
Run 14/3 cables between the two switch boxes and from one switch box to the ceiling light fixture box. Leave at least 6 to 8 inches of extra cable in each box. This makes it easy to maneuver wires.
Get In Touch!
Text Us For A Quote3. Identify the Power Source
Use a voltage tester to determine where power is entering the circuit. It will come into one of the switch boxes or the ceiling light junction box. You’ll connect the common wire there.
4. Connect the Common Wire
Connect the black “common” wire in the power source box to the common brass screw on one 3 way switch. Connect the white neutral wire in the power source box directly to the light fixture.
5. Connect Traveler Wires Between Switches
Connect the red and black traveler wires from the common switch to the traveler screw terminals on the second switch. This allows the switches to communicate on/off signals.
6. Connect Switches to Light Fixture
Connect the black common wire from the first 3 way switch to the black wire leading to the light fixture. Use wire nuts to secure the connections.
7. Ground All Boxes and Switches
Connect the ground wire to the green grounding screw on both 3 way switches and also within the light fixture box. Make sure grounds are tight.
8. Mount Switches and Test Circuit
Attach both 3 way switches in their boxes and put on the faceplates. Turn the circuit power back on and test that the switches work to control the light fixture as expected. Enjoy your new 3 way control!

3 way Switch Wiring Mistakes to Avoid
It’s very common for DIYers to make minor wiring mistakes that cause 3 way switches not to work properly. Here are some tips to avoid common snafus:
Don’t mix up the traveler wires. Be sure to connect the red and black travelers between matching brass terminals on each switch. Mixing these up is a frequent issue.
Questions About A Project?
Let's Connect!Getting the power and light connections backwards will cause problems. Double check that power is running to the common terminal and the light is connected to the common/black wire leading to the fixture.
Don’t forget to connect all ground wires within the boxes for safety. The travelers do not need grounds. A proper ground prevents electrical fires.
Verify that 14/3 cable with ground is used between all boxes. Regular 2-wire cable won’t work for a 3 way wiring configuration. Using the right cable is key.
Make sure all electrical connections are secure and tight. Loose wire nuts can lead to intermittent functionality or safety hazards.
Smart 3 way Switch Upgrade
Standard 3 way toggle switches work fine, but upgrading to smart 3 way light switches offers some cool benefits:
Convert your existing setup to work with home automation systems. Control lights with smart speakers!
Control lights from smart speakers or your smartphone with no hassle. “Alexa, turn on the hallway light.”
Set lighting schedules and timers for added convenience and security. Have lights turn on when you’re away.
No rewiring required! The basic wiring setup stays the same. Just match wire colors.
Just match the wires from your existing switches to the proper screw terminals on the new smart switches. Download the app, link devices to your wi-fi, and enjoy!
Upgrading to smart 3 way switch technology is one of the best ways to modernize your home’s lighting in a day. It makes your life easier while adding value.
Let There Be Light!
That covers the basics of how to wire 3 way light switches. To recap:
Use 14/3 cable between boxes and ensure proper electrical box size. This prevents dangerous cramping.
Follow the wiring diagram closely, connecting the common wire to the power source. Mistakes here cause headaches.
Take care when connecting the travelers to avoid simple mix-ups. They must match.
Verify that all ground wires are securely connected. Safety first when dealing with electricity.
Consider upgrading to smart switches for 3 way light control from your phone. Welcome to the future!
Installing a 3 way lighting configuration is more involved than a basic single-pole light switch, but now you have the knowledge to wire two switches to control a light fixture like a professional electrician. Just take it step-by-step.
Before you know it, you’ll have the convenience of controlling lights from multiple locations in your home. No longer will you need to walk to the opposite end of a hallway or climb staircases in the dark just to turn off an overhead light. You’ve got this!
FAQs
Q: What is a 3-way light switch?
Q: How does a 3-way switch work?
A: A 3-way switch works by allowing electricity to flow from one common terminal to one of two traveler terminals on the switch, and then on to the second 3-way switch through another set of traveler terminals.
Q: What are the basic steps to wire a 3-way light switch?
A: The basic steps to wire a 3-way light switch include identifying the power source, connecting the wires to the appropriate terminals on each switch, and testing the switch to ensure proper functionality.
Q: Can a smart switch be used as a 3 way switch?
A: Yes, smart switches can be used as 3-way switches, but they may require specific wiring configurations and additional smart switches for multi-location control.
Q: What is the difference between a 3 way switch and a single-pole switch?
A: The main difference is that a single-pole switch controls a light or set of lights from a single location, while a 3-way switch allows control from two different locations.
Q: What are traveler terminals on a 3 way switch wiring?
A: Traveler terminals on a 3-way switch are the terminals used to connect the switch to another 3-way switch, allowing for the control of the same light from two different locations.
Q: What are some common wiring mistakes when installing a 3-way switch?
A: Common wiring mistakes include misidentifying the common wire, improper placement of traveler wires, and failing to connect the ground wire for safety.
Q: Can I install 3 way switch wiring without a neutral wire?
A: In most cases, no. 3-way switches typically require a neutral wire for proper operation, especially when installing smart switches or those with advanced features.
Q: What tools are needed to wire a 3-way light switch?
A: The tools needed include a voltage tester, wire stripper, screwdriver, needle-nose pliers, and electrical tape for secure connections.
Q: Are there specific precautions to consider when wiring a 3-way switch?
A: Yes, it’s important to turn off the power at the circuit breaker before starting, double-check all connections, and use proper insulation and electrical tape to secure the wires.
